Chat app experiment
January 22, 2020
| Purpose | To create a real-time chat application and learn the basics of Sockets.io |
| Project Dates | January 22, 2020 |
| Technologies | NodeJs/Express, React, Styled Components, JavaScript, Socket.io |
| Repository | https://github.com/meechanism/chatapp |
I haven’t played around with Socket.io’s event-driven real-time API before. I thought it would be a perfect candidate for creating a chat application.

Concept
The idea was to have a simple web-based chat application relay messages between users.
- Users can join on a landing page where they input their name and a channel they want to join.
- Both fields be free-form for the prototype.
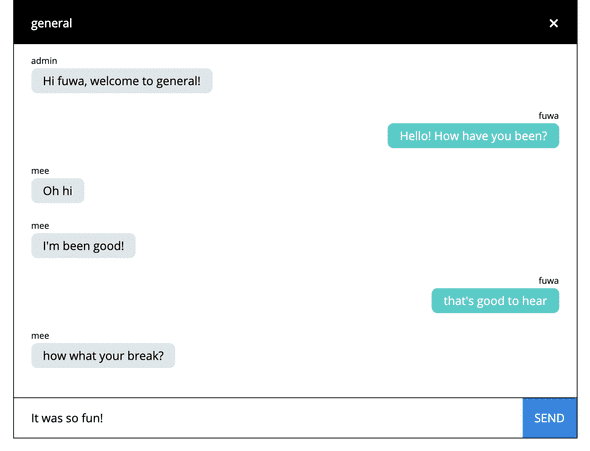
- Mimic a standard social media chat interface where other users appear on the left and the current user’s message are on the right.
Client and serverside tools
I decided to use Create React App to quickly get the web application running and removed most of the boilerplate.
I used styled-components to create declarative, functional, and composable units of UI components.
To handle state, I used React Hooks.
Socket.io’s client was used to connect and manage the socket on the client-side.
For the server, I used ExpressJS + Socket.io to handle realtime events. The server will also handle some simple user management.
Sockets on the client-side
I found the Socket.io client api to be fairly straight-forward. Their documentation provides ample examples and descriptions for writing the basic needs of this chat application.
At first, I wasn’t sure how and where I would integrate the client-side, but it turns out all you have to do is add a couple useEffects to handle some events.
-
Add a
useEffectfor handling when the component renders. Within it, we want to do two important things:- Setup the connection with the io function, which will return to you a new socket connection
- Add the user to the specified channel. We can let the server know what the user and channel are by emitting a
joinevent and passing along that data. The server can then do some user management. -
Additionally, we only want to set up the socket and join for a user once, so for the initial
useEffect, add the socket endpoint and user data as the re-render skip-effect arguments. Example:useEffect(() => { // ... }, [IO_ENDPOINT, USER_DATA]);
- To handle dismounts, return a function within your
useEffectthat will emit a disconnect method so your server will handle that user appropriately. - To handle incoming messages, subscribe to the
messageevent with the on method. - To send a message to the channel, emit with the event
messageand provide the user and message as payload.
The server will take care of the rest!
Sockets on the server-side
For setting up Sockets on the server, we need to do the following:
-
Set up an event on listener for the
connectionevent. When we connect, we are provided asocketin the callback in which we can listen to the following events and handle them appropriately:- When a user
joinsa channel - When a user emits
sendMessage - When a user disconnects
- When a user
- Additionally, when a user joins or leaves, we can choose to emit a message to welcome/dismiss that user and also broadcast a message to all the other users in the channel about their updated status.
Future improvements
This was very much an exercise in using Sockets.io, but it was a good start to a chat application foundation. In some future iterations, I can add the following changes:
- Create a drop-down menu with a premade list for channels or allow users to optionally create their own and then later users can optionally join their channels from that premade list.
- Be able to join multiple channels
- Channel management
- Proper state management
- Message history
- Channel status + user list
If you want to check out the project, download the chatapp over at the Github repository!